Make your Facebook profile private: Facebook’s data security settings are a continuous challenge, not least because users’ choices continue to change. The social network increasingly allows users to monitor where their posts are shown and what personal data is used to serve ads. But these other choices have made Facebook privacy management much more complicated. This article will help you to make your Facebook account private in easy steps.
We have here developed a 6-step guide to ensure the best possible securing of your Facebook account.
Step 1: See How Your Facebook Public Profile Looks Like
The first thing you want to do is find out how many people will see your Facebook data. Tap on the eyes bottom right side of your picture cover to reach your profile page. Click “View As” in the drop-down menu.
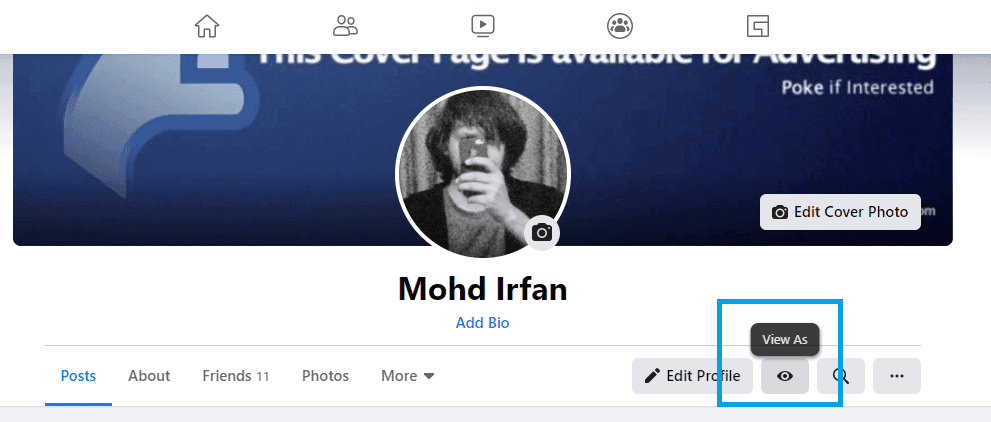
This takes you to a version that reveals to people who aren’t friends on your Facebook profile. Some details will still appear to strangers, such as your name, current profile, and a photo cover. But who sees other types of content can be decided. Try scrolling through this view through your profile page to see how many of your posts can be publicly seen by non-friends.
Step 2: Decide Who Can See Your Facebook Posts
In Step 1, you can find that you have shared posts with everyone on Facebook unintentionally. Whenever you write, Facebook gives you the ability to decide easily what audience you want to share.
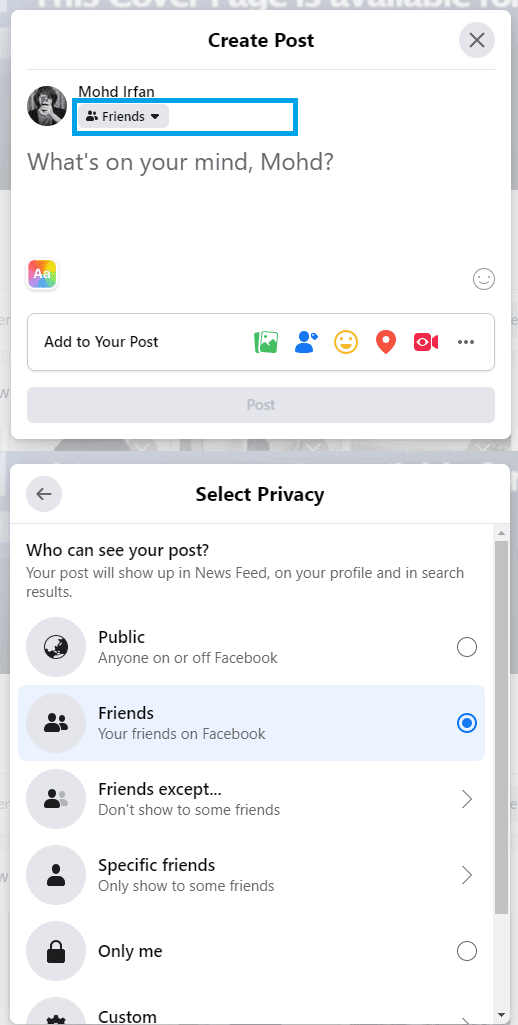
To the left of the “Post” button, a box showing who may access a specific content is shown. Click on the box to pick an audience from a menu — “Only me,” “Friends,” and “Public” are the most popular ones. You may also share posts or create custom lists with people in your based on the known. This will only allow you, for example, to share your childhood photos with family members.
No matter which audience you choose for a certain post, it is the default. So if you post as “public,” Facebook will then make your posts public by default. Facebook also provides an ability to privatize old posts when you think you’ve unintentionally made too many posts available. Choose “Settings” in the drop-down menu in the right top-down corner of Facebook. On the Settings panel, on the left side of the rail, you click on “Privacy,” then you pick on the “Who Can See You Facebook Post”.
Step 3: Delete unnecessary Facebook apps
You have probably approved hundreds of applications over the years to access your Facebook data to easily login or upload a contact list. Facebook has tracked all such applications and now allows you to limit access to information for individual apps.
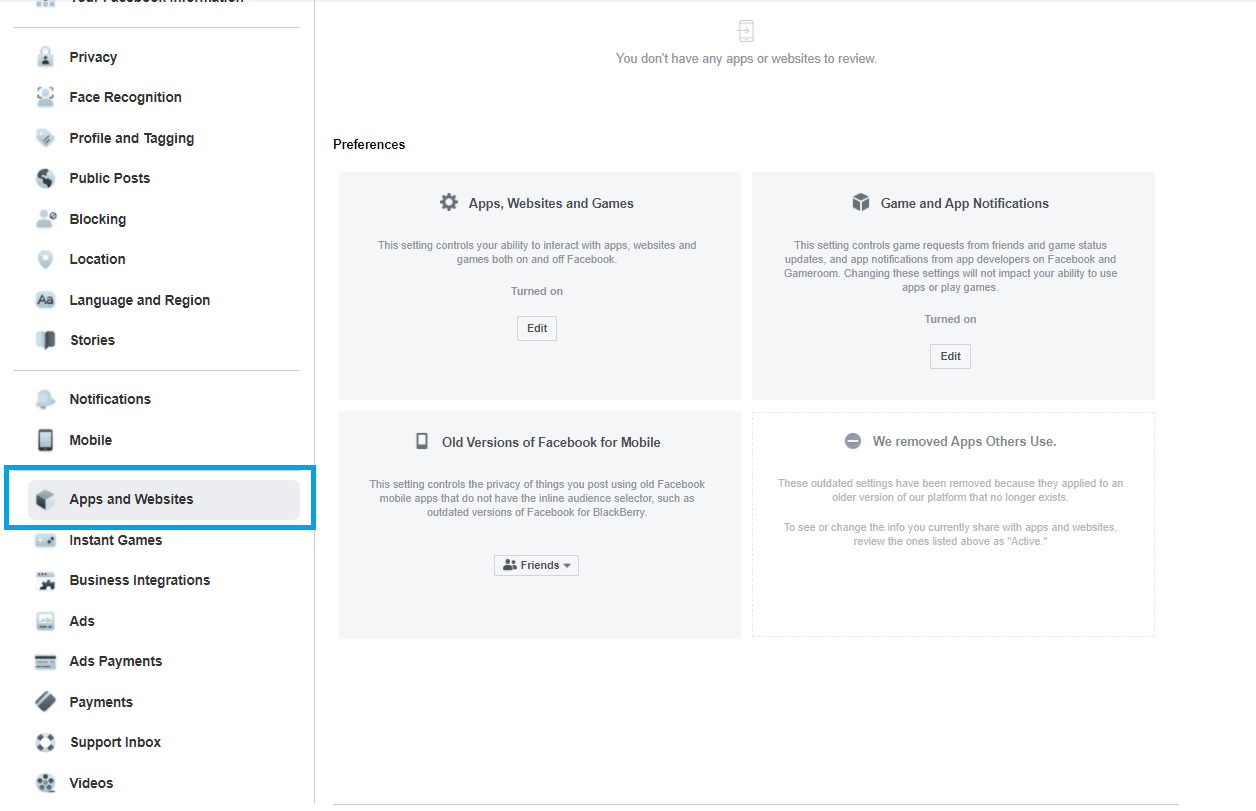
Choose “Apps and Websites” on the left-hand menu on the Settings screen. All your Facebook-authenticated applications will be shown to you with a grid. You can see a list of all the personal details that you share with the app from your day of birth to your photos and location, click any application. You may opt to avoid sharing a single data point or delete the link of the app straight to your Facebook account. You may also disable the ability of an app to send Facebook updates to you. This could stop you, for instance, from keeping up to date on the habits of your aunt’s Candy Crush.
Step 4: Make Your Facebook profile harder to find
Facebook has made it easier for other users to find you on the web, all user accounts are searchable since 2013. However, users can also avoid the listing of their profiles in the results on Google and other search engines.
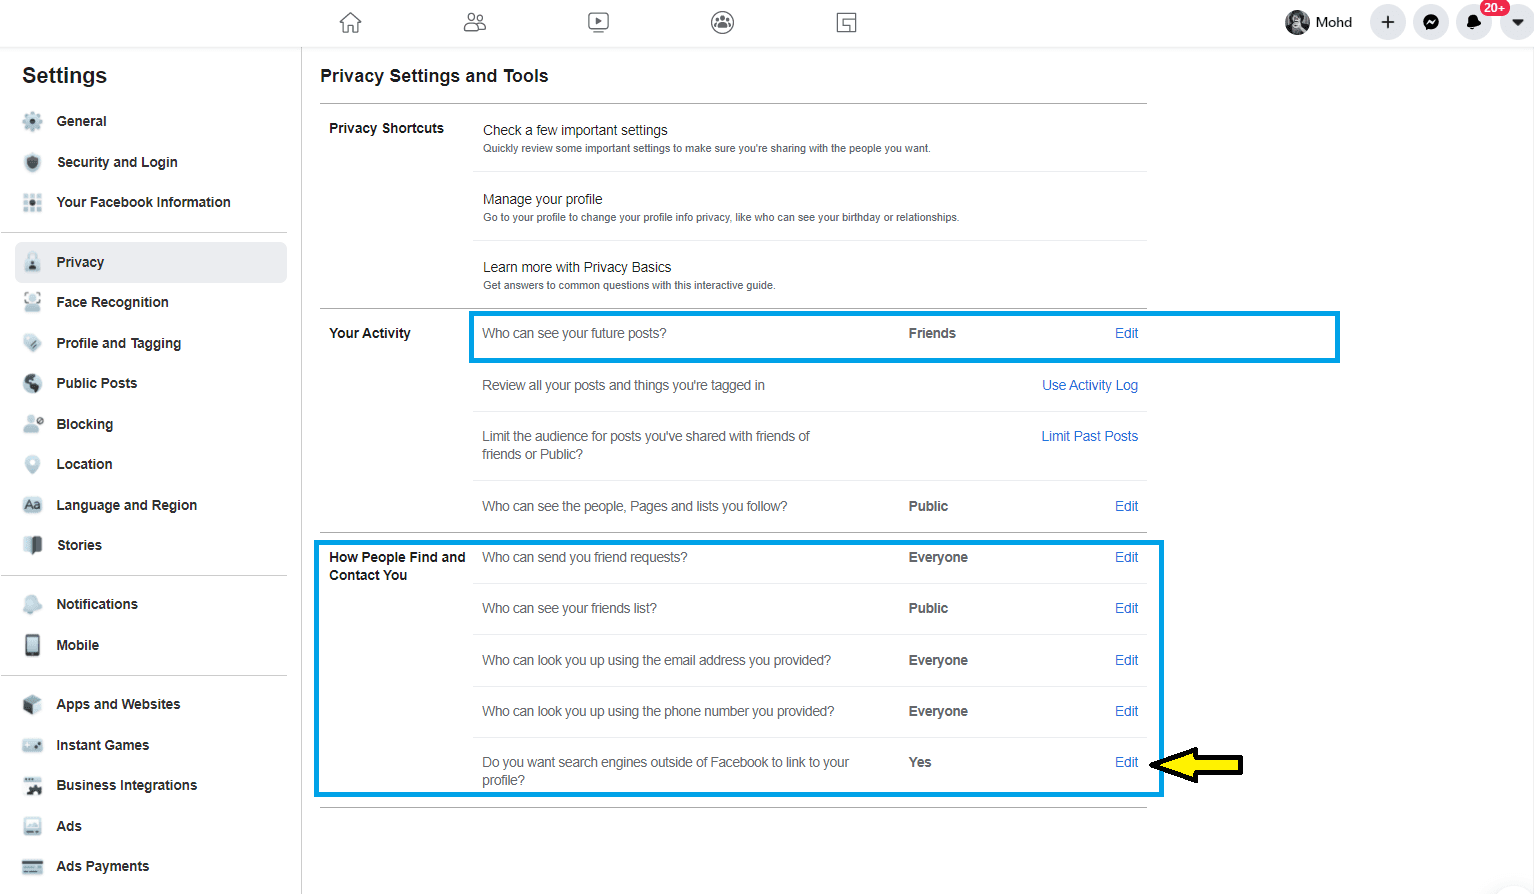
Select “Privacy” on the left side of the Settings tab, then answered “No” to the final question, “Will search engines linked to your profile beyond Facebook?” “You can also choose on the same screen whether anyone can send friend requests.
Step 5: Configure your Ads Settings
Facebook monitors your internet surfing habits and uses this information to provide targeted ads for you. You should tell the company to quit if it seems creepy to you. Click “Ads” on the left panel from the Settings menu. The first segment addresses Facebook terms “Audience-based Advertising.” If you disable this configuration, you will still see the same number of ads, but they will not be personalized for your online history. However, all your actions on Facebook appear to be equal to serve targeted ads.
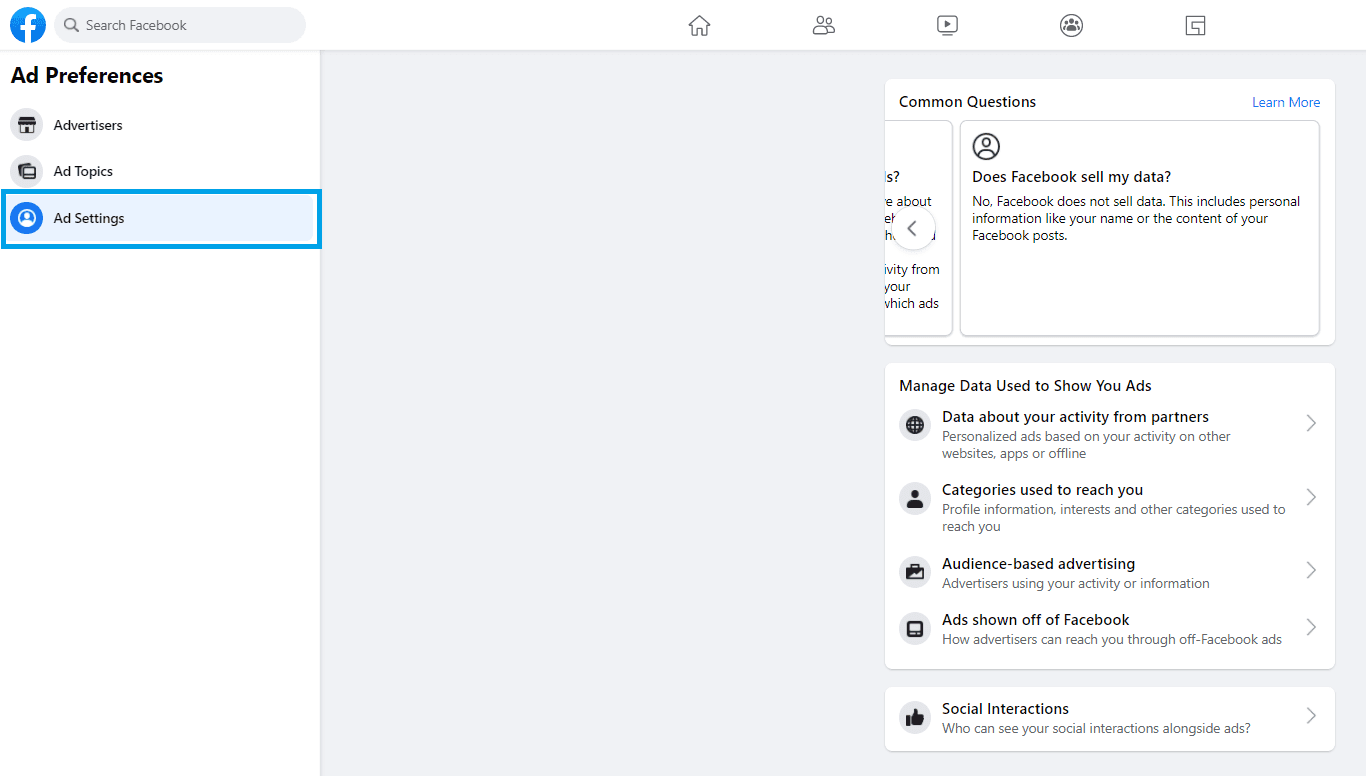
Under this option, advertisements associated with your social actions can be switched off. Facebook makes advertising in other news feeds more appealing by using your preferences and shares while this configuration is on. So if you like the Google page, this information will appear in a friend’s feed without your knowledge alongside a post sponsored by Google. In this line, pick “None” and Facebook will not use your likes like this.
Step 6: Block Facebook Users
The “Blocking” option on the left side of the Settings menu allows you to block those users. You can block users, so the users cannot see or add as friend to your profile. You may also prevent users from carrying out such acts, such as inviting events or inviting apps. Please note also that on this settings page there is a separate Facebook Block option.
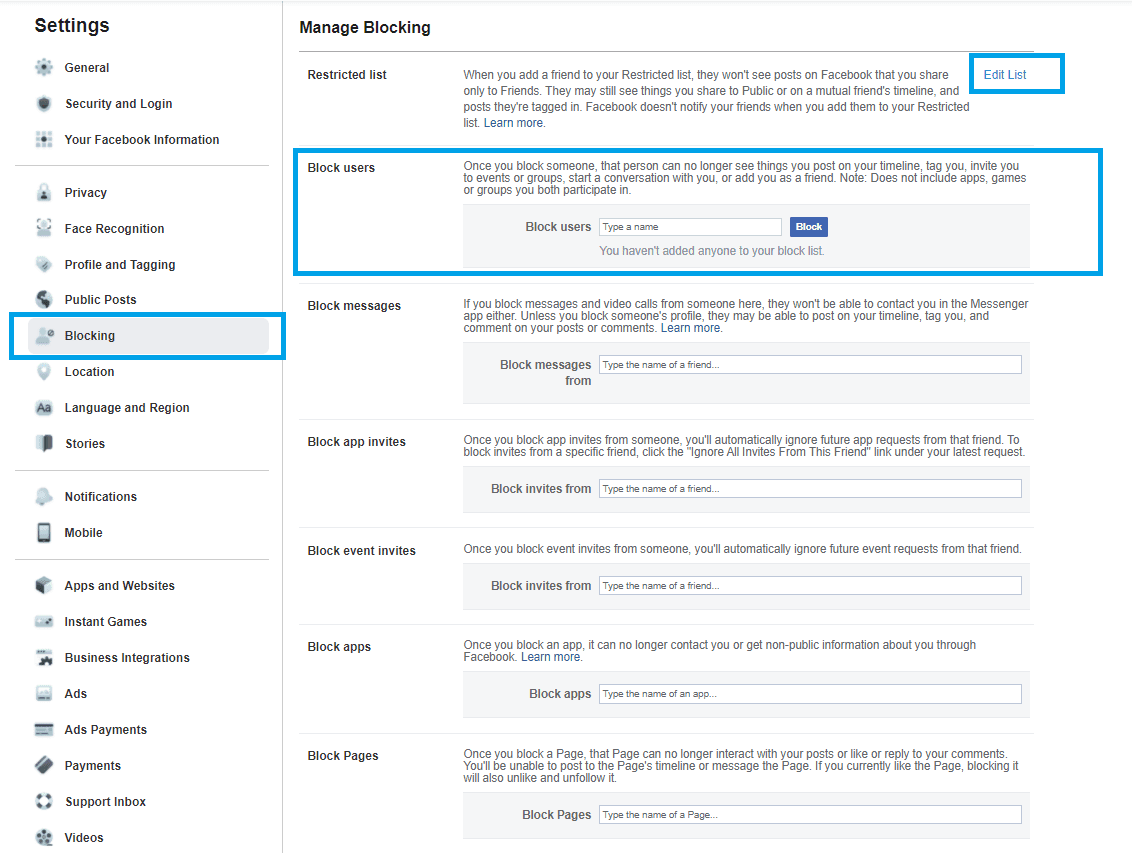
Users may also include users on this page in the “Restricted List.” Anyone on the list will see the updates and details that you share with the public overall – and they don’t know that they have been put on this list. So you might consider putting your colleagues on this list and marking those posts as “public” if necessary if your colleagues want your helpful privacy articles on Facebook and not your harsh party images.
Also READ,